Thursday, June 20, 2013

Two more sources of nectar

When I was out in front, I heard a lot of buzzing.  Looking around, I found the source- the catalpa tree.
On the underside of a catalpa leaf

You may recall sometime ago when I wrote about extrafloral nectaries.  Well, catalpas are one of the plants with this source of nectar and are mentioned in this article.
Maidi had bought some marigolds for our yard party and she wanted me to plant them.  I put them in front of the cucumbers.  I wondered if bees visited marigolds.  I learned from on online search that marigolds repel many insects and nematodes and are therefore used as companion plants in vegetable beds.  Some marigolds will also repel bees.  Fortunately, ours do not:

She blends in well
Yesterday when I was tending to the roses, I heard a lot of buzzing.  There was a cloudlet of bees in front of hive 3.  Oh no, I thought, they're going to swarm.  When I had done the sticky-board counts last week, this hive had as much as the others, but since it had so many fewer bees, I figured the ratio of mites:bees was unhealthy.  I had only one Mite Away quick strip and two strips is the recommended treatment.  So I concluded that even though there was plenty of room in the hive, they were unhappy with the mites and were therefore swarming or absconding.
Fortunately, they all went back into the hive, so it must have been a large orientation flight.
First videoSecond video.
I had already ordered more quick-strips, but I put the remaining single one in, just in case. 
I still don't know what I'm doing.

Thursday, June 13, 2013

Solar melter; it works!

I needed a melter to process the beeswax.  There are well-constructed, fancy ones available, but I found this on YouTube and decided to make one like hers.
First, I needed a styrofoam cooler.  Every once in a while, I would stop by a garage sale to look for one.  I had been expecting that cheap coolers would soon be in the stores for summer.  However, last week at work, we received some medicine that needed to be cold.  It was in a thick styrofoam box with cold packs.  One of the nurses, who knew I wanted to make a melter, asked me if I wanted it the box.  Natch.
Next, I needed glass.  I had one pane for a long time, but it got broken when Jesus Chavez's crew was cleaning the yard.  I was going to go to Orchard for the glass, when Maidi suggested I use the glass from an old collage frame.  So, down to Ace for a glass cutter and glass breaking pliers.  It worked quite well and now I had two panes of glass.

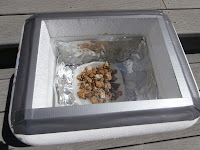
 Using a steak knife, I cut a rectangle out of the lid.  I glued one pane of glass inside and duct taped the other to the outside.  I had to cut away two shelves from inside using my keyhole saw.
I lined the box with tin foil, put some water in a plastic tube and placed my paint straining bag around it, holding it taut with a clothes pin- so hi tech.

I put a bunch of wax on the cloth, put the lid on and waited, impatiently.  In not too long, I could see the wax starting to melt.  Then there were drops of was visible in the water.  Ultimately, I may have waited too long as the water was boiling and the residue on the bag was pretty cooked.

After 40 minutes

After one hour

After 4 hours. Melted wax on boiling water
As soon as I took the lid off, there was a strong smell of wax and two bees came over to investigate.  It was a little tricky to get the wax into the house simultaneously keeping the bees outside.  I put the wax in the fridge to cool.
My first (somewhat) purified bees wax
There was a little debris in the wax, but it the process worked. Now I need a bigger tub and either a larger bag or an old pair of pantyhose.

Saturday, June 8, 2013

Sometimes, it looks like I know what I'm doing

Today I switched out the drone frames in hives 1&2.  No problems, really.  Of course, all I did was take off the supers and upper brood boxes, lever out the drone frame without moving any other frames and then slide the new frame into place.  Nothing dropped, no stings, little disturbance.  Wow!
I looked at about 10 drone pupae- no mites.  Does this means the mites are under good control (I hope so) or just sampling error or something else?  I'll do a sticky board count next week.
Two days ago, when looking in Olea's hive window, I saw the queen, with her red mark, crawling around the side of a comb; pretty exciting.

Friday, June 7, 2013

A fine mess, or Someday I may know what I'm doing, part 2

Who knew that bees liked olive flowers?


A nice frame of brood in hive #2
A couple of days ago, I thought I'd try to take some honey from Olea's hive.  According to my new book on top-bar beekeeping, taking some honey during the honey flow is ok and the bees will just make more comb and honey.  It may even have the benefit of preventing swarming by giving the bees more room.  Well, as we all know, a little knowledge is a dangerous thing.
According Les Crowder's book, white, capped honey comb can be kept intact to be eaten while old comb should be cut off the bar and mashed to extract the honey.  Accordingly, I brought to the hive, a large pot (my beer brewing pot) for the old comb and a box to hold the new comb on the bar.  I was careful to bring a cover for both to keep the bees out.  I also brought empty bars to replace all the bars I removed.  Der mentsh trakht un Got lakht.
The last time I went into Olea's hive I suffered the deleterious effects of cross-combing, so this time I intended to be deliberate and avoid repeating that experience.  I carefully removed the end board and the last top-bar.  The comb wasn't completely straight, as you can see.  No problem so far.
Last top bar with comb inverted on top of hive
There are spacing shims between the top bars.  I figured if I removed these first, I would be able to see into the space between combs and cut any cross-combing; then I could remove the bar without any trouble.  Figure again!  After taking out the spacer, I could see some crossing.  I cut across it, spilling a little honey.  Ok so far.  Then I lifted the bar and bam!, the comb fell off spilling honey all over!  Back to the house for the tongs.  I had to remove the next couple of bars.  One had very little comb.  The next looked like it had capped honey, so I placed it in the box.  There were bees all over it, so the cover was superfluous.  I moved other bars around, making a bit more of a mess by cutting cross-combs.  I then fished out the broken comb and put it in the pot.  There were probably a couple of hundred bees stuck in all the honey.  There was quite a mess in the hive, as well.
Looking down into the top-bar hive after the broken comb was removed.  Those are bees on the bottom stuck in the honey
I then re-assembled the hive.  I had to brush all the bees off the piece of comb.  After I did, yikes!  It was a frame of brood with capped honey only at the top.  I re-opened the hive, took out an empty bar and replaced the frame I had taken out. Then I took the pot onto the deck and picked out the bees, putting the comb into a bowl.  There was a couple of ounces of honey, as well as bees and comb, in the bottom of the pot. Honey gained- one broken comb of ripe, uncapped honey. 
What's left  in the pot after the comb had been removed
Maidi suggested I should make videos of my beekeeping techniques entitled "How not to...".  It would probably be a best seller.