At the end of last month I attended the titled conference in Oregon. This link is information regarding it. The talks seemed to be mostly for larger operations than mine, but I learned a lot by talking with other backyard beekeepers. It seems that many of us have made the same mistakes along the way.
One of my personal high points was meeting and talking with Tom Seeley. I asked him about the technique for marking the thousands of bees in his artificial swarms. Here is the picture if you don't remember. He would cool a few bees in a baggie in the refrigerator, then place them on blue ice and glue on the tag, one-by-one. What a job!
For one of the workshops, Prof. Seeley had made an artificial swarm. I was able to see the scout bees doing their waggle-dance. The next day, the scouts had decided on a site, had stopped dancing and were making a piping sound that lets the swarm know that it's time to get ready to go. This is the only recording of the piping I could find. The piping occurs at about 5:25, maybe other places, too. The bees started making their buzz runs indicating they were about to take off. I waited to watch, but my ride was waiting and I had to leave. The swarm probably took off soon after I left. This link is to a facebook page for the conference that has a picture of Tom Seeley, Kat Nesbit (conference organizer) and one of the speakers in front of the swarm taking off.
Wednesday, August 7, 2013


Monday, August 5, 2013
Are you still reading this?
I'd like to know from you, my audience, if I should continue posting this blog. If you'd would enjoy further posts, should I make any changes? Fewer links? More videos? Any suggestions? Let me know soon. Thanks
 |
| The apiary on July 31 |
Wednesday, July 17, 2013
Vacation over
The plums had ripened in our absence and many had fallen to the ground. I was surprised to see the bees all over them. I think they were sucking the juice rather than eating the pulp; they ignored the older plums.

I took a look into the hives on sequential days and put in sticky boards for a mite count.
Hive 1: There was no honey in the top super, but the other super was very heavy, maybe 30 pounds. The top deep box was also pretty heavy but I didn't inspect it. I switched out the drone frame. There were drones hatching as I watched.
Hive 2: No honey in super. There doesn't seem to be much new comb being drawn. The hive looks healthy but nothing is changing- the population seems static. Switched out the drone frame.
I looked at about 10 pupae and saw no mites other than one that was on top of a capped cell.
Hive 3: There was no brood in the top box (there had been before). There was capped honey around where the brood had been and some nectar. There was still empty foundation on the peripheral frames in both boxes. I spotted the queen. There were 4-1/2 frames of capped brood, but this colony doesn't seem to be growing either. I'm wondering about it making it through winter. I'm thinking about how to deal with it; feeding, combining hives, sink or swim?
I took the sticky boards out after 4 days and the counts were high- 102,22,32- and I decided to treat all three with formic acid (mite away quick strips MAQ). What a job that was. One lesson I learned is that this kind of work would be a lot easier with 2 people. I also learned that it's a good idea to follow instructions. The packs have a picture of scissors pointing one way, and I didn't think it mattered which direction one went... until I went the other direction. The formic acid pads have a paper wrapping around them that helps control the rate of evaporation (I think). I discovered that this wrapper is open at one end and cutting the plastic pack open the wrong way also cuts and tears this wrapper.
I put one pad in #3 because of the small number of bees. In the other hives I put the recommended 2. The pads are laid on top of the frames between the two deep boxes. The bees make brace comb in this same space. I tipped the top box up to expose the bottom and scraped off the wax. Then I scraped off the wax on from the tops of the other frames. Even doing that, the boxes in #1 didn't fit together properly and I had to open it again and scrape off more wax. Then I just pressed down hard on the boxes to close the gap between them. I still don't know what I'm doing.
The next day there were a lot of dead bees on #2 porch and inside under the lid. This is the one that had the damaged paper wrapper.
 |
| Earlier the porch was carpeted with corpses |
 |
| Under the telescoping lid |
Here is a video of wash-boarding from a couple of weeks ago.
Thursday, June 20, 2013
Two more sources of nectar
When I was out in front, I heard a lot of buzzing. Looking around, I found the source- the catalpa tree.
You may recall sometime ago when I wrote about extrafloral nectaries. Well, catalpas are one of the plants with this source of nectar and are mentioned in this article.
Maidi had bought some marigolds for our yard party and she wanted me to plant them. I put them in front of the cucumbers. I wondered if bees visited marigolds. I learned from on online search that marigolds repel many insects and nematodes and are therefore used as companion plants in vegetable beds. Some marigolds will also repel bees. Fortunately, ours do not:
Yesterday when I was tending to the roses, I heard a lot of buzzing. There was a cloudlet of bees in front of hive 3. Oh no, I thought, they're going to swarm. When I had done the sticky-board counts last week, this hive had as much as the others, but since it had so many fewer bees, I figured the ratio of mites:bees was unhealthy. I had only one Mite Away quick strip and two strips is the recommended treatment. So I concluded that even though there was plenty of room in the hive, they were unhappy with the mites and were therefore swarming or absconding.
 Fortunately, they all went back into the hive, so it must have been a large orientation flight.
First video. Second video.
I had already ordered more quick-strips, but I put the remaining single one in, just in case.
I still don't know what I'm doing.
 |
| On the underside of a catalpa leaf |
You may recall sometime ago when I wrote about extrafloral nectaries. Well, catalpas are one of the plants with this source of nectar and are mentioned in this article.
Maidi had bought some marigolds for our yard party and she wanted me to plant them. I put them in front of the cucumbers. I wondered if bees visited marigolds. I learned from on online search that marigolds repel many insects and nematodes and are therefore used as companion plants in vegetable beds. Some marigolds will also repel bees. Fortunately, ours do not:
 |
| She blends in well |

First video. Second video.
I had already ordered more quick-strips, but I put the remaining single one in, just in case.
I still don't know what I'm doing.
Thursday, June 13, 2013
Solar melter; it works!
I needed a melter to process the beeswax. There are well-constructed, fancy ones available, but I found this on YouTube and decided to make one like hers.
First, I needed a styrofoam cooler. Every once in a while, I would stop by a garage sale to look for one. I had been expecting that cheap coolers would soon be in the stores for summer. However, last week at work, we received some medicine that needed to be cold. It was in a thick styrofoam box with cold packs. One of the nurses, who knew I wanted to make a melter, asked me if I wanted it the box. Natch.
Next, I needed glass. I had one pane for a long time, but it got broken when Jesus Chavez's crew was cleaning the yard. I was going to go to Orchard for the glass, when Maidi suggested I use the glass from an old collage frame. So, down to Ace for a glass cutter and glass breaking pliers. It worked quite well and now I had two panes of glass.

 Using a steak knife, I cut a rectangle out of the lid. I glued one pane of glass inside and duct taped the other to the outside. I had to cut away two shelves from inside using my keyhole saw.
I lined the box with tin foil, put some water in a plastic tube and placed my paint straining bag around it, holding it taut with a clothes pin- so hi tech.
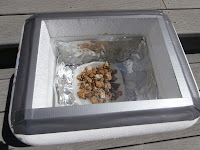

I put a bunch of wax on the cloth, put the lid on and waited, impatiently. In not too long, I could see the wax starting to melt. Then there were drops of was visible in the water. Ultimately, I may have waited too long as the water was boiling and the residue on the bag was pretty cooked.
As soon as I took the lid off, there was a strong smell of wax and two bees came over to investigate. It was a little tricky to get the wax into the house simultaneously keeping the bees outside. I put the wax in the fridge to cool.
There was a little debris in the wax, but it the process worked. Now I need a bigger tub and either a larger bag or an old pair of pantyhose.
First, I needed a styrofoam cooler. Every once in a while, I would stop by a garage sale to look for one. I had been expecting that cheap coolers would soon be in the stores for summer. However, last week at work, we received some medicine that needed to be cold. It was in a thick styrofoam box with cold packs. One of the nurses, who knew I wanted to make a melter, asked me if I wanted it the box. Natch.
Next, I needed glass. I had one pane for a long time, but it got broken when Jesus Chavez's crew was cleaning the yard. I was going to go to Orchard for the glass, when Maidi suggested I use the glass from an old collage frame. So, down to Ace for a glass cutter and glass breaking pliers. It worked quite well and now I had two panes of glass.


 Using a steak knife, I cut a rectangle out of the lid. I glued one pane of glass inside and duct taped the other to the outside. I had to cut away two shelves from inside using my keyhole saw.
I lined the box with tin foil, put some water in a plastic tube and placed my paint straining bag around it, holding it taut with a clothes pin- so hi tech.


I put a bunch of wax on the cloth, put the lid on and waited, impatiently. In not too long, I could see the wax starting to melt. Then there were drops of was visible in the water. Ultimately, I may have waited too long as the water was boiling and the residue on the bag was pretty cooked.
 |
| After 40 minutes |
 |
| After one hour |
 |
| After 4 hours. Melted wax on boiling water |
 |
| My first (somewhat) purified bees wax |
Saturday, June 8, 2013
Sometimes, it looks like I know what I'm doing
Today I switched out the drone frames in hives 1&2. No problems, really. Of course, all I did was take off the supers and upper brood boxes, lever out the drone frame without moving any other frames and then slide the new frame into place. Nothing dropped, no stings, little disturbance. Wow!
I looked at about 10 drone pupae- no mites. Does this means the mites are under good control (I hope so) or just sampling error or something else? I'll do a sticky board count next week.
Two days ago, when looking in Olea's hive window, I saw the queen, with her red mark, crawling around the side of a comb; pretty exciting.
I looked at about 10 drone pupae- no mites. Does this means the mites are under good control (I hope so) or just sampling error or something else? I'll do a sticky board count next week.
Two days ago, when looking in Olea's hive window, I saw the queen, with her red mark, crawling around the side of a comb; pretty exciting.
Friday, June 7, 2013
A fine mess, or Someday I may know what I'm doing, part 2
 | ||
| Who knew that bees liked olive flowers? |
 | |
| A nice frame of brood in hive #2 |
According Les Crowder's book, white, capped honey comb can be kept intact to be eaten while old comb should be cut off the bar and mashed to extract the honey. Accordingly, I brought to the hive, a large pot (my beer brewing pot) for the old comb and a box to hold the new comb on the bar. I was careful to bring a cover for both to keep the bees out. I also brought empty bars to replace all the bars I removed. Der mentsh trakht un Got lakht.
The last time I went into Olea's hive I suffered the deleterious effects of cross-combing, so this time I intended to be deliberate and avoid repeating that experience. I carefully removed the end board and the last top-bar. The comb wasn't completely straight, as you can see. No problem so far.
 |
| Last top bar with comb inverted on top of hive |
 |
| Looking down into the top-bar hive after the broken comb was removed. Those are bees on the bottom stuck in the honey |
 |
| What's left in the pot after the comb had been removed |
Subscribe to:
Posts (Atom)